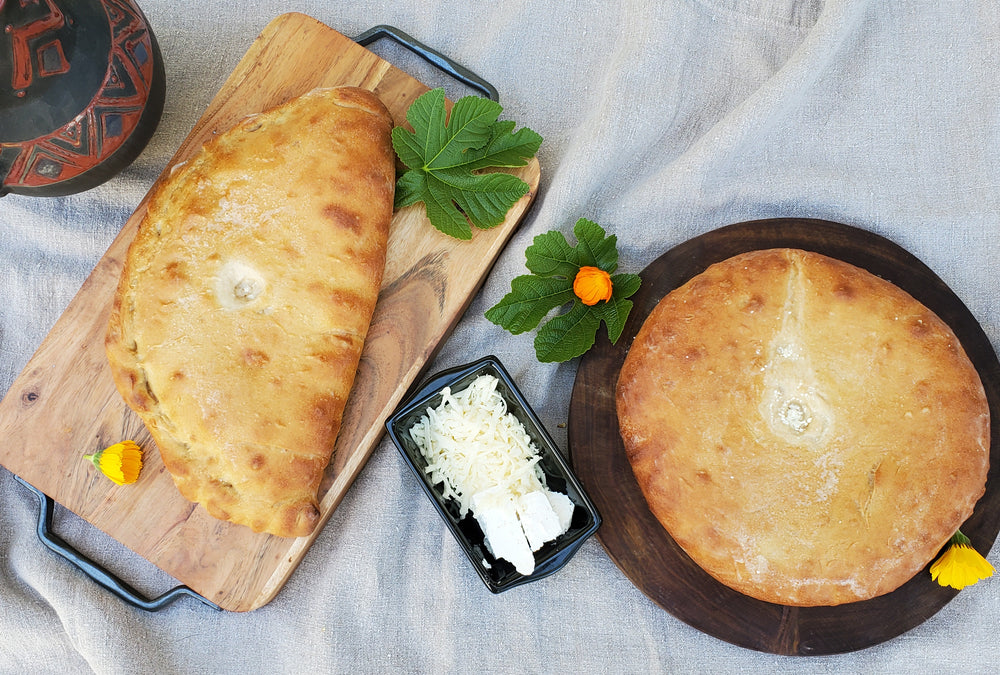
Imeruli Khachapuri
This ancient Georgian cheese-filled bread is taking the world by storm. And no wonder – while It may seem modest, it is in fact anything but: the cheese and bread come together to create simple yet luxurious golden magic. The mix of our two flours makes this dough very easy to work with, and the bread comes out very light and delicate, with a nice chewy texture to it.
Nika Franchi

Prep Time
20 Minutes
Bake Time
30 Minutes
Total Time
4-5 Hours
Yield
4 one-pound flatbreads
Ingredients:
For the dough:
2 2/3 cups (400g) Sequoia flour
1 1/3 cup (200g) Trailblazer flour
1 teaspoon (6g) instant dry yeast
2 cups (400g) warm water, divided
1 teaspoon (5g) sugar
1 teaspoon (5g) sea salt
1 tablespoon (20g) light vegetable oil
For the filling:
4 cups (600g) feta cheese, preferably sheep's milk, mashed or coarsely grated
3 cups (400g) fresh mozzarella cheese, preferably buffalo, coarsely grated
½ cup of water or more, at room temperature
Baker's Notes:
* 3 hours if your kitchen is quite warm, 4 hours if it's on the cooler side. Alternatively, you can mix the dough the night before and let it rise, covered, in the refrigerator. Next morning, take it out (it should've doubled in size), let come to room temperature and proceed with the rest of the instructions.
** These shaping instructions are straightforward but the actual process may be a little tricky. Ideally, you will end up with a flatbread in which both the top and bottom layers of dough are equally thin. It may take a bit of practice.
If you are not yet confident in your shaping abilities, here's a simplified version of shaping. It is not traditional but is equally delicious. Take one portion of the dough and roll it out into a large thin disk, about half an inch thick or even less. Spread your cheese mixture evenly on one side of the disk, fold the other half over the filling and pinch the edges together by hand or with a fork to seal your half-moon pies. Proceed with the baking instructions.
*** Big appetites will have no problem devouring one flatbread each. More modest eaters will be filled with just one half-bread each.
Instructions:
To make the dough:
- Start mixing the dough 3-4 hours before you're ready to bake* (see Baker's Notes). In a small cup, activate the yeast: mix together 100g warm water, sugar and yeast. Let sit for 10-15 minutes until the mixture is foamy.
- In a bowl of an electric stand mixer, combine the remaining 300g water, sea salt, vegetable oil, yeast mixture and the two flours. Mix with a paddle attachment on medium speed for about 5 minutes. Let sit for 5 minutes to absorb water.
- Switch to the dough hook attachment and knead on medium speed for about 5 minutes, until the dough has come together into a ball and is soft and supple.
- Lightly spray the dough ball with vegetable oil, cover with plastic wrap or a tea towel and let rise until doubled in size, about 2-3 hours. If your dough is rising too fast, punch it down and let it rise again.
To make the filling:
- Combine the two cheeses in a bowl and mix well. Start adding water a little bit at a time, mixing well between additions. You want to be able to shape the filling into a cohesive ball, so keep adding water until the cheese mixture holds together.
- Shape into two equal-size large balls.
- Cover, set aside, and begin shaping the bread.
To shape:
- On a lightly floured work surface, divide the dough into two equal portions of about 515 grams. While working with one flatbread, keep the other portion of the dough covered with plastic wrap or a tea towel.
- Flatten a portion of the dough into a disk that is about 2" wider than the diameter of your cheese ball.
- Set the cheese ball in the middle of the dough disk and carefully bring up the edges of the dough to completely cover the top of the cheese. Stretch it gently if the edges don't quite reach over the top of the cheese.
- Pinch the edges of the dough together to completely seal your "package." Try to keep air out as much as possible.
- Turn your new ball over, seam side down, and gently flatten it into a disk with your hands.
- Using the rolling pin and working in light, quick movements, start rolling out the disk until it is about 1" thick. Make sure not to tear the dough. If there's a little bubble of trapped air, work around it** (see Baker's Notes).
- With your fingers, tear a little vent hole in the center of the top crust. Transfer onto a parchment-lined baking sheet and cover with a tea towel
- Repeat steps 2-7 with the other dough portion.
- Cover with a tea towel and let proof while the oven is heating, about 30 minutes.
To bake:
- Preheat the oven to 400°F. Position the rack in the middle of the oven.
- When the oven is hot, uncover the baking pan and slide it onto the oven.
- After 15 minutes of baking, rotate the baking sheet 180°. Bake for another 15 minutes or until the breads and golden (the cheese may start bubbling through the vent at this point).
- Take out of the oven, slather the tops of the bread with unsalted butter (this step is optional) and serve piping hot*** (see Baker's Notes).
Baker's Notes:
* 3 hours if your kitchen is quite warm, 4 hours if it's on the cooler side. Alternatively, you can mix the dough the night before and let it rise, covered, in the refrigerator. Next morning, take it out (it should've doubled in size), let come to room temperature and proceed with the rest of the instructions.
** These shaping instructions are straightforward but the actual process may be a little tricky. Ideally, you will end up with a flatbread in which both the top and bottom layers of dough are equally thin. It may take a bit of practice.
If you are not yet confident in your shaping abilities, here's a simplified version of shaping. It is not traditional but is equally delicious. Take one portion of the dough and roll it out into a large thin disk, about half an inch thick or even less. Spread your cheese mixture evenly on one side of the disk, fold the other half over the filling and pinch the edges together by hand or with a fork to seal your half-moon pies. Proceed with the baking instructions.
*** Big appetites will have no problem devouring one flatbread each. More modest eaters will be filled with just one half-bread each.